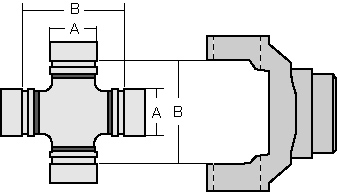
Always Double check your
measurements before removing the OEM U-Joint.
Measure as follows, permitting yourself a tolerance of .003 at
the bore diameter (A) & .005
between the yoke (B).
(NOTE: find a flat surface to measure to avoid the area that has been
staked. This dimension will not match our specifications)
If your u-joints have broken down
to the point of
damaging the yoke. THIS SERVICE WILL NOT
WORK.
Disassembly
of the "Non-Rebuildable" U-Joint
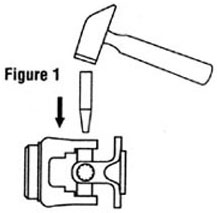
Use a press or a hammer to
force the bearing cap
out of the staked ear hole. Refer to (Fig. 1)
Note: Considerable force
may be required
Be careful not to bend the
yoke or flange ears, and
do not damage the ear holes.
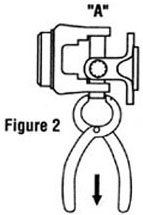
Use a vise or pliers to remove
the bearing cap which
is exposed on the opposing side, a twisting motion
may help unseat the cap. Refer to (Fig. 2)
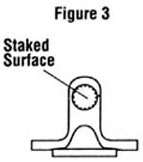
A small grinding wheel may
then be used to smooth
the staked ear hole (Refer to Fig. 3) on the driven
side "A" (Fig. 2) in order to make the removal of the
opposite bearing cap easier.
Use the same method as stated
above to remove
the remaining bearing caps.
Once the bearing caps are
removed discard the used
joint and inspect the yoke and flange for damage
and clean out the remaining staked tabs and any
excessive burs to provide smooth installation of
the new caps.
Reassembly of the "Non-Rebuildable" U-Joint
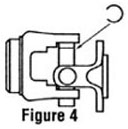
Press the new U-Joint and
bearing caps into position
and insert clip. Refer to (Fig 4)
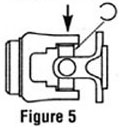
Use a press or hammer to
expose the opposite slot
then insert the second clip. Refer to (Fig 5)
Use the same method to insert
the remaining clips.
Make certain that the clips
are completely seated
into the groove of the new bearing caps.
For Factory Direct
Sales & Service
Contact Us:
Rockford Drive Line
1500 11th Ave.-Rockford, IL-61104
815-962-1411 - (fax) 815-965-4857
E-mail Sales
Technical question